Friday, June 2, 2017
How To Unlock Samsung Galaxy Pro After Too Many Pattern Attempts
How To Unlock Samsung Galaxy Pro After Too Many Pattern Attempts

- Firstly, shut down your Samsung Galaxy.
- Remove the battery.
- Put your battery back.
- Press the “up volume key”, “Power button” and the ‘Home button” simultaneously, until you see the “Recovery Mode" Screen.

Available link for download
Wednesday, May 31, 2017
How To Unlock Pattern Security Locked itel it1453 ITEL it1501 ITEL it1502 And ITEL it1503
How To Unlock Pattern Security Locked itel it1453 ITEL it1501 ITEL it1502 And ITEL it1503


Available link for download
Tuesday, May 30, 2017
How to use two phone numbers at a time on WhatsApp ogwhatsapp
How to use two phone numbers at a time on WhatsApp ogwhatsapp
There are ever more smartphones being released with DualSIM, that is, with the option to have two phone numbers on the same device so you can use them alternately. The problem with this is that most IM services don’t take advantage of this feature and it’s not possible to use both numbers at the same time instead of having to load one or the other. OGWhatsApp is an unofficial mod for the popular messaging service that lets you use two numbers simultaneously.
Like with WhatsApp Plus, this is a mod created from the official app via reverse engineering that adds a series of extra features not included by default. In the case of OGWhatsApp, its star feature is the ability to use the program from either of the two phone numbers associated with your phone, whether via the two SIM slots on your phone or a DualSIM.
The concept is very simple, since what you’re going to do is use both numbers is have two versions of WhatsApp installed at the same time on your device, so that each is associated with one of your two cards. These are the steps to install it.
- First off, you should make a backup of your message history if you want to keep it. To do so, go into WhatsApp to Settings > Chat settings > Save conversations.

- Now leave WhatsApp and delete the temporary WhatsApp files. On your Android device’s menu go to Settings > Applications and find WhatsApp. Inside, click on the Clear Data button.


- After You instelled any one from(
OGWhatsApp
- /OG1WhatsApp/OG2WhatsApp/OG3WhatsApp/OG4WhatsApp)
- FLW The Next image

Important
--------------------------
To install more than two digits do the same steps
Available link for download
Monday, May 29, 2017
How to put smiley emoticons photos animated letters memes on Facebook chat and comments
How to put smiley emoticons photos animated letters memes on Facebook chat and comments
I will start will regular emoticons which are officially supported by facebook. These simple smileys work both on chat and comments on both desktop and mobile site.
Here is the complete list of facebook icons listed below. Just type the short code in chat box and hit enter to get the animated smileys.
| Emoticon | Shortcut code | Notes |
|---|---|---|
| (^^^) | Shark with sharp teeth out. | |
| <(") | Penguin looking to the left. | |
| :|] | Robot face. | |
| :) | A happy smiley face. | |
| :( | A sad and frowning smiley | |
| :P | Sticking tongue out. | |
| :D | A big grin and laughing. | |
| :O | Shocked and surprised. | |
| ;) | Winking. | |
| B) | Nerdy smiley with glasses. | |
| B| | Cool smiley wearing. | |
| >:( | Upset and angry. | |
| :/ | Unsure or doubtful emoticon. | |
| :( | Crying emoticon with tears. | |
| 3:) | Laughing devil emoticon. | |
| O:) | A blushing angel with a halo. | |
| :* | Girl sending a kiss an winking | |
| <3 | A red heart emoticon. | |
| ^_^ | Kekeke happy emoticon. | |
| -_- | Annoyed, sighing or bored. | |
| o.O | Confused or WTF emoticon. | |
| >:O | Upset, angry or shouting | |
| :v | A Pacman emoticon. | |
| :3 | Cat faced smiley. | |
| :putnam: | Christopher Putnam. |
Below are more animated codes which are not officially supported by facebook. These are tricked items. So how it is being tricked.. we will discus later below. Now just paste the numbers below with double brackets on your facebook chat and see the magic. This will not work in comments.
[[f9.laugh]]
[[f9.sad]]
[[f9.angry]]
[[f9.sleepy]]
[[f9.kiss]]
[[f9.inlove]]
[[f9.pizza]]
[[f9.coffee]]
[[f9.rain]]
[[f9.bomb]]
[[f9.sun]]
[[f9.heart]]
[[f9.heartbreak]]
[[f9.doctor]]
[[f9.ghost]]
[[f9.brb]]
[[f9.wine]]
[[f9.gift]]
[[f9.adore]]
[[f9.angel]]
[[f9.baloons]]
[[f9.bowl]]
[[f9.cake]]
[[f9.callme]]
[[f9.clap]]
[[f9.confused]]
[[f9.curllip]]
[[f9.devilface]]
[[f9.lying]]
[[f9.rofl]]
[[f9.billiard]]
[[f9.cakepiece]]
[[f9.rosedown]]
[[f9.shutmouth]]
[[f9.shy]]
[[f9.silly]]
[[f9.tongue1]]
[[f9.fastfood]]
[[f9.ring]]
[[f9.plate]]
[[f9.candle]]
[[f9.party]]
So what is the trick??
The trick is the modification facebook gimmick feature which posts your profile picture inside the chat.
All you have to copy any facebook profile user name or profile url number and paste inside chat box with double brackets.
Example: Yours friends profile URL is http://www.facebook.com/akshay.kumar . So you have to paste[[akshay.kumar]] into the chat box and hit enter.
But friends this is not enough . We can have gangnam style dancing inside your friends chat box..
How! by superimposing many profile images to create a bigger picture.
For this we have to take the help of a website which generates facebook smiley codes from a bigger photo.
>>Go to the website smileychatcodes.com
>> Upload a image
>> Get the codes and
>> Paste into the facebook
That’s all.
By this way I have generated code for Shahrukh Khan photo.
[[533717986671372]] [[533717996671371]] [[533717983338039]] [[533718000004704]]
[[533717993338038]] [[533718486671322]] [[533718483337989]] [[533718473337990]]
[[533718476671323]] [[533718480004656]] [[533718656671305]] [[533718660004638]]
[[533718663337971]] [[533718666671304]] [[533718670004637]] [[533718870004617]]
[[533718820004622]] [[533718813337956]] [[533718866671284]] [[533718816671289]]
[[533719040004600]] [[533719036671267]] [[533719006671270]] [[533719013337936]]
Available link for download
How To Root XOLO Q900
How To Root XOLO Q900


3, Now Successful message display thats all.

Available link for download
Best Site To Download APK Files
Best Site To Download APK Files
Find a River Wallpaper for your desktop or Android device. Discover now our large variety of topics and our best pictures including Amazon River Wallpaper, Mountain River Wallpaper, Forest River Wallpaper, Winter River Wallpaper, River Wallpaper, River Wallpaper HD, Rivers and Streams Wallpaper, River Scenery Wallpaper and Marian Rivera

River Wallpaper 1

River Wallpaper 2

River Wallpaper 3

River Wallpaper 4
.jpg)
River Wallpaper 5

River Wallpaper 6
- River Wallpapers - Full HD wallpaper search
River Wallpapers - River desktop wallpapers - 6277 1920x1080 and 1920x1200 wallpapers - River Wallpapers, River Backgrounds, River Images
Free River wallpapers and River backgrounds for your computer desktop. Find River pictures and River photos on Desktop Nexus. - Rivers Wallpapers and Backgrounds - Desktop Nexus Nature
Free Rivers wallpaper and other Nature desktop backgrounds. Get free computer wallpapers of Rivers. - River Wallpapers HD, Desktop Backgrounds, Images and Pictures
Best river Wallpaper, Desktop Background for any Computer, Laptop, Tablet and Phone
DMCA - Disclaimer
All images displayed on this website are believed to be in the "Public Domain". We do not intend to infringe any legitimate intellectual, artistic rights or copyright. If you are the copyright owner of any image listed in our directory and want to have it removed, please contact us and we will attend to your request ASAP. All of the content we display including image are free to download and therefore we do not acquire substantial financial gains at all or any of the content of each image.
Available link for download
WhatsApps new status feature Everything you need to know
WhatsApps new status feature Everything you need to know
Just like Snapchat and Instagram, users can use emojis, draw on photos and add captions. Friends and family on the app can then reply to the Status, starting a new WhatsApp conversation.
WhatsApp headed off potential criticism that the app is copying Instagram or Snapchat, saying in the announcement that the app began as a simplistic way to let people know what you were up to, even before it introduced the messaging feature now synonymous with the app.

How to do a WhatsApp status
1. Open WhatsApp and select the Status tab.
Enjoy the new Whatsapp Feature...
Available link for download
Sunday, May 28, 2017
How To Download YouTube Videos without any software
How To Download YouTube Videos without any software

Hello guys !
As we know that everybody wants to download HD qualities videos from YouTube and for this they use any kind of download software and get very difficulties to doing that.
Today I tell you about "How to Download videos from YouTube easily without using any grabber software".
There is two methods that Ill tell you about that. Just simply changing by some characters in URL of YouTube videos link. Lets Ill show you that.
Method 1.
a, Open a YouTube video link. for example https://www.youtube.com/watch?v=phivZBpTdKY .Here I show you the screenshot. Click the image to large view.


Click on download and enjoy !
Method 2.


Available link for download
Guide How To Patch Install Poweramp Music Player v2 0 10 Build 588 Full Version For Free Video Guide Also Added
Guide How To Patch Install Poweramp Music Player v2 0 10 Build 588 Full Version For Free Video Guide Also Added


- plays mp3, mp4/m4a (incl. alac), ogg, wma*, flac, wav, ape, wv, tta, mpc, aiff
- 10 band optimized graphical equalizer for all supported formats, presets, custom presets
- separate powerful Bass and Treble adjustment
- stereo eXpansion, mono mixing, balance
- crossfade
- gapless
- replay gain
- plays songs from folders and from own library
- dynamic queue
- lyrics support, including lyrics search via musiXmatch plugin
- embed and standalone .cue files support
- support for m3u, m3u8, pls, wpl playlists
- OpenGL based cover art animation
- downloads missing album art
- custom visual themes, lot of skins available on Play
- 4 widget types with many selectable styles, advanced customization; Android 4.2 lock screen widgets
- configurable lock screen
- headset support, automatic Resume on headset and/or BT connection (can be disabled in settings)
- scrobbling
- tag editor
- fast library scan
- high level of customization via settings
COMMON QUESTIONS/ANSWERS FOR POWERAMP V2.X
Q. Does my Poweramp v2 purchase include the next Poweramp v3?
A. Yes, it does.
Q. My songs are missing from folders/library.
A. Please ensure you have all your folders with music actually checked in Poweramp Settings => Folders and Library => Music Folders.
Your original Android Library is not changed, nor any files deleted.
Poweramp library is a separate, completely independent library. When you installed Poweramp 2.0, it just got filled with the files scanned from your sd card/other flash memory, as specified in Music Folders.
Q. Volume too low. Volume changes weirdly. Other volume issues.
A. Try to disable Direct Volume Control in Poweramp Settings => Audio => Advanced Tweaks.
Poweramp 2.x uses Direct Volume Control by default on 2.3+ mid-to-high end devices. On stock ROMs this produces much better audio output. But many custom/buggy ROMs, while supporting DVC, can fail with it.
HOW TO PATCH & INSTALL
NOTE - You Need Root.
1. First Of All Download Poweramp Music Player v2.0.10 Build 588 & Unlocker Zip Package From The Links Given Below.
2. Extract The zip file & install Poweramp and Unlocker both APKs.
3. Now Download Lucky Patcher from the Link given below.
4. Open Lucky Patcher and Long Press On Poweramp Music Player.
5. Now Click On Custom Patch & Choose On patch.by.sanx_com.maxmpz.audioplayer.
6. Click On Apply & Wait some time.
7. Now youll see success screen.
8. Open Poweramp go to settings & VOILA Youll see That your purchased is verified.
Enjoy The Full Version Of Latest Poweramp Music Player for Absolutely Free
IF YOU ARE STILL FACING ISSUES JUST FOLLOW THE VIDEO GUIDE FROM THE LINK GIVEN BELOW
https://youtu.be/lQuiG1SLIT4
DOWNLOAD LINKS
Poweramp Zip Package Size - 6 MB
Dailyuploads Link
POWERAMP MUSIC PLAYER V2.0.10 BUILD 588 + UNLOCKER
Userscloud Link
MIRROR LINK 1
DropApk Link
MIRROR LINK 2
Bdupload Link
MIRROR LINK 3
-------------------------
Lucky Patcher v6.4.3 Apk Size - 6.2 MB
Lucky Patcher V6.4.3 Apk
LIKE CRAZY4ANDROID FACEBOOK PAGE
JOIN CRAZY4ANDROID FACEBOOK GROUP
Share This Post With Your Friends To Encourage Me
Available link for download
Saturday, May 27, 2017
Best App To Make Unlimited International Calls With Primo For FreeÂ
Best App To Make Unlimited International Calls With Primo For FreeÂ
Official Tiwul Wonogiri - Nurhana.mp4 Terbaru, Gratis Download Full Album: mp3 Tiwul Wonogiri - Nurhana Video. More Related Songs
Tiwul Wonogiri - Nurhana - KARAOKE - Tiwul Wonogiri dibawakan oleh Nurhana, produksi IMC [readmore]
We also have other in different categories. You can browse through the category and find your favorite. Or you can watch Tiwul Wonogiri - Nurhana - KARAOKE on Youtube { http://www.youtube.com/watch?v=bWCBMNkyYU4 }
 Or you can watch Tiwul Wonogiri - Nurhana - KARAOKE on Youtube { http://www.youtube.com/watch?v=bWCBMNkyYU4 }
Credits - Video
DMCA - Disclaimer
This video is shared by users. We dont upload the file, we just found on "youtube.com". We do not intend to infringe any legitimate intellectual, artistic rights or copyright. If you are the copyright owner for this file, please Report Abuse to "youtube.com" (source link) and if you liked this post, say thanks by sharing it.
Available link for download
5 Things You Need To Do During Design A Website Blog For The Newbie
5 Things You Need To Do During Design A Website Blog For The Newbie

- Header
- Blog Posts
- Profile
- Pages
- Google Adsense
- Attribution
<data:post.body/>
- Login into your Dashboard=>Settings=>Comments
- Scroll dow to the page and just check/tick the box for " Embedded below Post" Save changes and thats it.
- Backup your Template to avoid unecessary errors, but youre an export go ahead and do what you wanna do. Click inside and CTRL F to search for
<P class=comment- footer><b:if cond=data:post .allowComments>
<b:if cond=data:post .allowComments>
data:post.embedComment- form>
<b:include data=post name= Comment-form/>
- To Enable, Disable or display any widget on both device either mobile or Pc take it this way you need to know the exact ID of the Widget to locate it, dashboard>> Layout>>> Then click on it and highlight the Address bar to see the Id Then, Click on Template>>>Edit Template and Click on Jump To Widget, here the whole list of Widgets That make up your template will be highlighted. Simply click on the one you want and add
Example: <b:widgetid=ContactForm locked=False mobile=yes title=contactForm/>
- Gadgets: You add gadgets using third party widget becomes a profile as earlier listed, you name it any thing until for easy identification and you can arrange all these widgets by dragging and droping them to where you wish.
- 120*600
- 160*600
- 226*280
- 240*400
- 250*250
- 300*600
- 392*600
- 450*50
Available link for download
Thursday, May 25, 2017
How to show or display adsense ads on mobile version for blogger blogspot
How to show or display adsense ads on mobile version for blogger blogspot
WHY I RECOMMEND YOU GET THIS ADDED?
Well as for those of us that really want to earn with our blog sites or websites,you get to see that on your mobile template your adsense system is not visible and most of your blogs pages view trafficate from mobiles since these days the rate at which people use the mobile devices increases and the rate at which people use the pcs reduces and you keep wondering how do i get click on my adsense gadget when its not visible on my traffic sources coming from mobile?..well if thats the case heres a solution to that with this method you can add your adsense system to your blogger mobile view or better still add enough widget to your blogger mobile view, like the likes of popular post,blog archive,receive latest post via email...all of this gadgets you can make them visible on your mobile view of your blog Now lets get it started already.

You can also Join our facebook group discussion for more latest news about tech together with some mobile and pc tips and tricks.
Available link for download
Wednesday, May 24, 2017
New Way To Set And Play Multiplayer Mode On Pes 2017 Ppsspp
New Way To Set And Play Multiplayer Mode On Pes 2017 Ppsspp
- Buka aplikasi Framaroot

- Pilih antara Superuser/SuperSU

- Klik Boromir


Available link for download
Tuesday, May 23, 2017
Submit Your Blog’s Sitemap to Google Search Console
Submit Your Blog’s Sitemap to Google Search Console
First we need to understand what a site map is, and why submitting your sitemap to search engines is important.
What is a sitemap?
A sitemap is an XML file that contains the URLs inside your blog. This file helps crawlers to find all of the URLs of your blog. There are many aspects of your site that a crawler will follow, such as the size of your sitemap and the number of URLs in your sitemap.

Now that we know what a sitemap is, let’s move to the next level.
Submitting sitemaps to Google Search console:
When we submit a sitemap to Google, we do so using the Search console tool. Assuming that you have already verified your site in Google search console and that you have logged in to your webmaster tool dashboard here, you have your sitemap link ready to go. If you have used an offline tool to generate your sitemap, upload it to the root of your site like this: /sitemap.xml
Inside your Google Webmaster Tool dashboard, on the right-hand side you will see an option called “Sitemaps”. Click on “More” to see all submitted sitemaps, or you can submit a new sitemap from there.
Click on “Add/Test Sitemap” to submit your sitemap file. On the same page, you can see which sitemaps are discovered by Google or which sitemap files have been previously submitted by you or someone from your team.

Available link for download
Monday, May 22, 2017
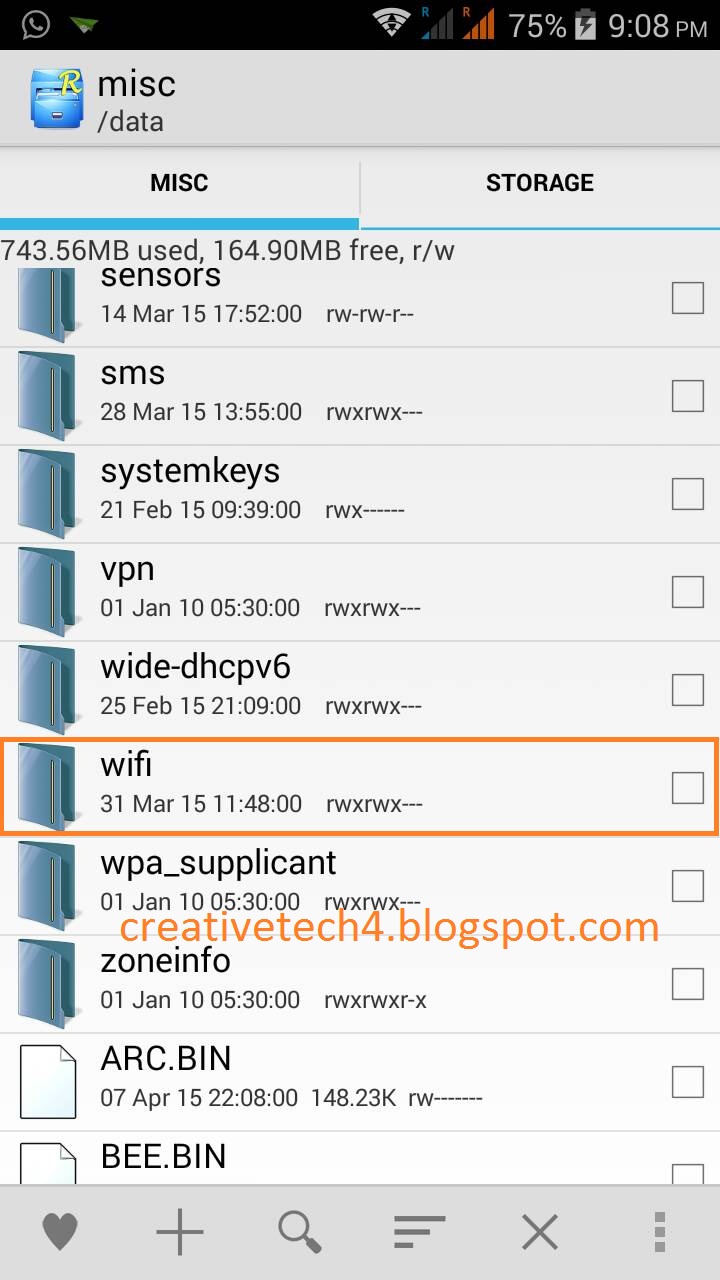
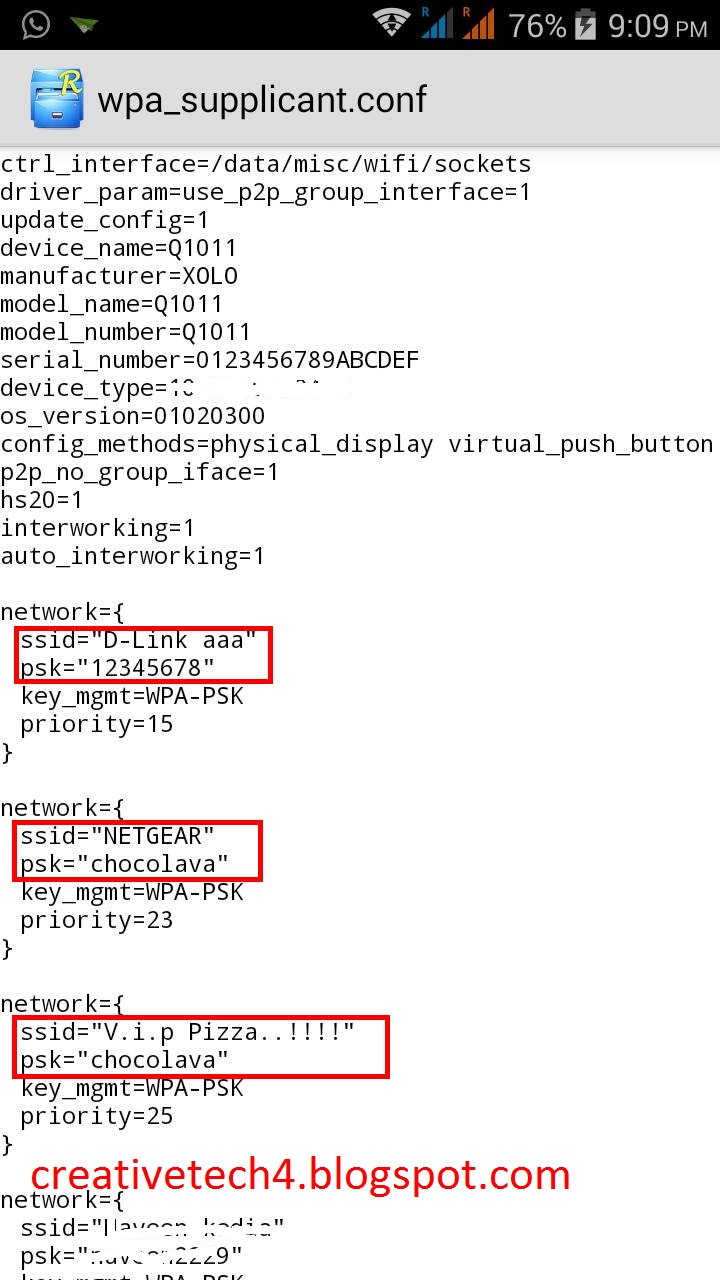
How to know wifi password if forgotten in android
How to know wifi password if forgotten in android
If you forgot your wifi password then no need to worry just read this tutorial and find how to resolve this problem here.

.jpg)
.jpg)
.jpg)
.jpg)
Video Tutorial on YouTube.
Available link for download
Sunday, May 21, 2017
HOW TO TAKE SCREENSHOT IN ANDROID GUIDE
HOW TO TAKE SCREENSHOT IN ANDROID GUIDE
Today’s I’m here to share “How to Take Screenshot in Android” after end of the post, you’ll defiantly like our that post, because as I know most of all the peoples know that how to take screenshot in android but what about when your method not work and I know about the method as well as you, the method is volume up + lock button.
I know when I have old android device and on android device there is no option to take screenshot because it is old android 2.3 and also volume up + lock method not works for me, then again I do Google for that to sort out for take screenshot in old android device that is not supported any key screenshot features.
And it is very important if you are wapmaster and needed to take screenshot for your post, then it is necessary to upload a screenshot of your android device to make trust of your visitors. Now I’m going to share two methods for take screenshot in old android 2.3 devices.
Method First to Take Screenshot in android: -
1. Take your android device in your hand.
2. Now unlock your phone first.
3. Now Press volume up + lock button {both are at same time}
4. Now Press volume down + lock button {both are at same time}
5. That’s it! You Have Done.
Method Second to take screenshot with software {No Rooted Needed}
I’m sharing an awesome android app, which will help you to take screenshot in android and also there is no rooted needed and it’ll work on rooted or un-rooted device.
1. First download the Screenshot Capture App from Here.
2. Now Install it and open.
3. Now go to setting and set screenshot saver path.
4. And also select overlay button to take screenshot anytime and everywhere {whether you using UC browser, Facebook App or anything}
5. That’s click on overlay button to take screenshot.
6. You have done.
Available link for download
How to Charge Your Phone Without Electricity
How to Charge Your Phone Without Electricity
Step 1: Take a 9 Volt Battery
They are the square battery with two holesStep 2: Take a Coin
anyoneStep 3: Take the Car Adapter
which it connects to the power inlet of the carStep 4: Meets All Three
brings together the three and your cellStep 5: Take the Battery and Adapter
grabs the battery and adapter and the tip of adapter in one of the holes in the batteryStep 6: Take the Coin
and put the coin in the other holeStep 7: Finally
connect the adapter the cell , put the coin in the other hole and readyAvailable link for download
Saturday, May 20, 2017
SnapTube YouTube Downloader HD Video Beta v4 13 1 8666 VIP Apk Premium features unlocked No need to install VIP Premium app
SnapTube YouTube Downloader HD Video Beta v4 13 1 8666 VIP Apk Premium features unlocked No need to install VIP Premium app

MP4 videos are available in resolutions: choose the small size of 360 pixels or the high-definition 720 pixels.
DIRECT MP3 DOWNLOADS
Download any YouTube music video directly as an MP3 file. No extra encoding process or plugin needed. Save space and listen to your favorite music video anytime you want.
SEARCH VIDEOS WITH KEYWORDS
Search a video with keywords. Easily find the exact video you want.
DISCOVER NEW VIDEOS
Explore videos in your favorite categories like Music and Movies. Discover new videos with recommended lists from our curators.
MANAGE VIDEO DOWNLOADS
Pause, cancel or resume a video download. Delete the videos you dont need anymore. Manage all of your video downloads in one place.
VIP PREMIUM FEATURES:
- No banner ads.
- Permanently remove app ads
- Enable Batch download feature
- Enable 2K & 4K download option for some HD videos.
WHATS NEW IN V4.13.1.8666 BETA
1. More stable searching service
2. Better download experience
3. App language changeable
4. Other bugs fixed
DOWNLOAD LINKS
Apk Size - 7.9 MB
Dailyuploads Link
SNAPTUBE V4.13.1.8666 BETA VIP APK
Userscloud Link
MIRROR LINK 1
DropApk Link
MIRROR LINK 2
Bdupload Link
MIRROR LINK 3
Clicknupload Link
MIRROR LINK 4
Available link for download
How to turn off or disable driver signature enforcement on Windows 8 and 8 1 Full Guide
How to turn off or disable driver signature enforcement on Windows 8 and 8 1 Full Guide

BEFORE WE BEGIN
Driver signature enforcement should only be disabled if you are positive that you need it to be disabled Driver signature enforcement can be re-enabled by simply rebooting.
HOW TO DISABLE DRIVER SIGNATURE ENFORCEMENT IN WINDOWS 8/8.1
Press Win + C on your keyboard to open the Windows Charm bar.
Select the gear icon in the charm bar. Selecting this icon will bring you to the modern ui control panel.
On Windows 8
Select ‘General‘, scroll all the way to the bottom of the page and click on the restart button located under the ‘Advanced Startup ‘ section.
After restarting in the advanced mode, a screen will come up with two options. Select the ‘Troubleshoot‘ option.
When the ‘Troubleshoot‘ option is selected, another window will appear. Find and click the option that says ‘Advanced options’.
In the advanced options window, select the ‘Startup settings‘ option.
Inside the ‘Startup settings ‘ window, a list of selectable boot options will appear. Press the F7 key to disable driver signature enforcement.
Once you’ve selected the option to disable driver signature enforcement reboot back into windows .
On Windows 8.1
In the Modern UI control panel find ‘Update & recovery ‘ on the left hand side of the menu.
Once in ‘Update & recovery,’ select ‘Recovery ‘ in the list of options on the left hand side of the modern ui menu.
After restarting in the advanced mode, a screen will come up with two options. Select the ‘Troubleshoot‘ option.
When the ‘Troubleshoot‘ option is selected, another window will appear. Find and click the option that says ‘Advanced options’.
In the advanced options window, select the ‘Startup settings‘ option.
Inside the ‘Startup settings ‘ window, a list of selectable boot options will appear. Press the F7 key to disable driver signature enforcement.
Once you’ve selected the option to disable driver signature enforcement reboot back into windows.
Done!
Though driver signature enforcement is a necessary security feature, sometimes it can be a real pain. Luckily though, with a bit of tinkering, it can be temporarily disabled when need be. Enjoy!
Available link for download
Friday, May 19, 2017
Talk To Me Cloud
Talk To Me Cloud

NOTE :
Some languages were removed due to incompatibility with the new translation API. The old translation API was deprecated and is no longer available.
Features:
- speech recognition in 15 languages
- output voices in over 30 languages.
- home screen widget
- translation can be sent as SMS (text only) and email (text and voice).
- supports Android 3.x devices (Honeycomb)
This application does not use any TTS library. It uses a web service for text-to-speech operations and it’s compatible with Android 1.5 or later.
Available link for download